I have been making some granny square blankets recently.
I had seen Mikey’s pattern for the never ending granny square but his pattern required an odd number of strands. I wanted to use 2 colors.
I figured out how to modify Mikey’s pattern to use 2 colors and finished my first blanket, adding in a third color towards the outside.
I realized that the regular square granny square wasn’t ideal for a blanket. When you got the blanket long enough it was too wide. So I set about making a rectangular granny square. I decided to work this out myself instead of search for a pattern.
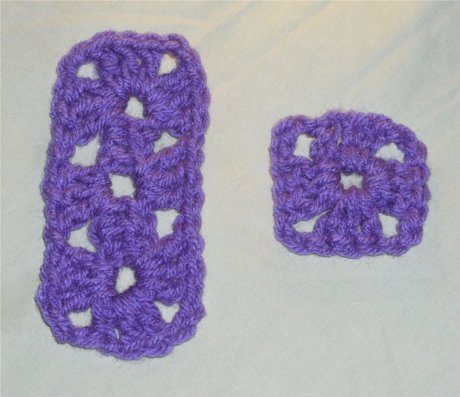
Once I had my rectangular granny square pattern I took a look online for other rectangular patterns to compare. I was happy to see that my pattern was as good if not better than those I found. in particular, I think my central piece looks very close to how the center of a regular granny square looks:
So here is how I made it.
1. THE CHAIN
This pattern starts with a chain. This length is important. First you need to count the number of chain loops. The chain must be in multiples of 4 then when you reach the desired length, add 2 additional chains.
For example the picture above I chained 8 (4×2) then added 2 for a total of 10.
The total length of the chain is important too. If you make your chain 1 foot long then your finished blanket will always be 1 foot longer than it is wide. If the chain is 2 feet long your finished blanket will always be 2 feet longer than it is wide. If you want a 4 foot by 6 foot blanket, the chain needs to be 2 feet wide.
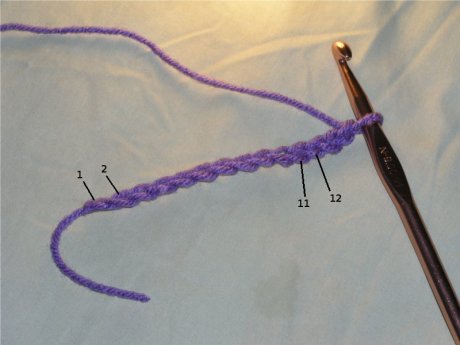
Here is my chain:
Here I have chained 12 (4×3) then added 2. I have marked stitch 11 in the chain as this is where we will be making our first half-double crochet. Note – make the first stitch in the chain a little tight.
2. 3 HALF DOUBLE CROCHET, CHAIN 1
Make a half-double crochet into stitch 11 (correction – 4 stitches from the hook). Make sure when you crochet into the chain you have 2 loops on the top of the hook and 1 below. Follow with 2 more half-double crochet in each of the next 2 stitches.
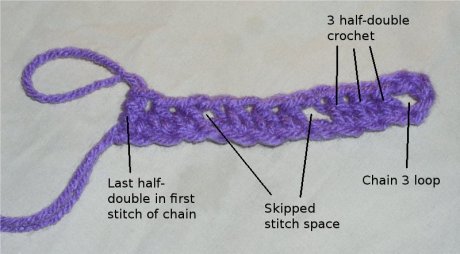
Chain 1 then skip a stitch in the chain and half-double crochet into the next stitch, follow with 2 more half-double crochet in the next 2 stitches.
Continue this pattern down the chain. If you counted your chain correctly, you should end up after the last set of 3 half-doubles with no more chain:
3. FORM THE OTHER END
We need to form the equivalent of a chain 3 loop on the end of the row. To do this chain 2 then half-double crochet into the first stitch of the chain (the same place as the previous half-double).
Then chain 2 and TURN.
Put a further 2 double crochet into the space created then chain 2 followed by 3 more double crochet into the space. This finishes the first corner.
4. CHAIN 1 AND 3 DOUBLE CROCHET DOWN THE LINE
Chain 1 then 3 double crochet into the first space that was created when we skipped a stitch down the half-double crochet line. Finish up the line with chain 1 followed by 3 double crochet into each skipped stitch gap.
When you get to the chain 3 loop at the other end. Finish up the 3 double crochet in the last skipped stitch gap, chain 1 then 3 double crochet into the chain 3 end loop. Chain 2 followed by 3 double crochet into the same loop, chain 2 followed by 3 double crochet in the same loop. This completes 2 more corners:
Chain 1 then work 3 double crochet into the skipped stitch space down the other side until you end with 3 double crochet in the loop at the opposite end.
At this point you could finish the corner like a traditional granny square and continue in a new row around. I am going to add in the second color at the top of the chain 2. DO NOT cut your first color but pull out a big loop so nothing comes unraveled.
5. ADD THE SECOND COLOR
Create a slip stitch in your second color, slide your hook through the top of the chain 2, attach the slip stitch, pull through then pull both strands through the slip stitch. Tighten this stitch down.
I like to leave a long tail when attaching my second color then working the tail and the working yarn together until the tail is used up.
Chain 2 followed by 3 double crochet into the corner space. Chain 2 then 3 more double crochet in corner. Chain 1, 3 double crochet in next space.
The pink can continue around following the regular pattern of a granny square except that you will not have to join or chain again; just keep going around.
6. CREATE THE NEVER ENDING PATTERN
The loop we created by chaining the pink after attaching it will act as the “corner” for the PURPLE yarn. With the PURPLE yarn chain 1 then work 3 double crochet into the pink chain loop. Chain 2 then 3 more double crochet into the pink loop.
7. CONTINUE AROUND UNTIL YOUR BLANKET IS DONE!


would love to see a finished picture,ty
Hi Lilly, here is a picture of a blanket I made for my daughter with some white added in towards the outside. Not a great picture, but it gives you a look at a finished blanket.

So where and how do you end off when you are done?
sorry for the super late reply!
i dont really remember the specific way I finished that blanket, ! could go and look at the blanket i made if you are still interested 🙂
yes please let me know, I have a blanket started but don’t know where or how to finish it off… 🙂
there are several ways you can do it,
take a look at the end of this video from 27 minutes onward.
In the video, if you have 2 or more colors you can finish the first color with 3 double crochet in the final corner and tie that color off then the second color you would complete the 3 double crochet in the last space, then chain 1 and double crochet into the very last double crochet of the color beneath. Then you could edge with a granny stitch.
If you just have 1 color then as you approach the corner that you want to finish off at, you could put a double crochet, then a half double crochet and then a single crochet into the final corner and tie off. Then you could edge around with crochet into each stitch.
Hope that helps!
Thank you! I just found Never Ending Granny Squares and was wondering how to go about doing a rectangle one! This is great!
sorry fo the super late reply!
Thanks! Im glad you are enjoying the pattern 🙂
Thank you, your pattern was so easy to understand. I’m left handed and was having a terrible time figuring out other never-ending patterns. I love the rectangular shape. I’m actually working on my second one. They are so quick and very pretty. Both are with bright variegated and then a dark color for contrast. I do have a few questions. First of all, how did you add the white in your blanket and how do you finish the pattern and edge it. How big would you make it for an infant?
Thanks again,
My family and friends are all gonna love these and your pattern has inspired me to return to crochet after many years due to illness.
sorry for the super late reply!
I’m very glad you are enjoying the pattern!
I cant remember the exact steps i took th add the white, i could go and take a look at the blanket and work it out if you are still interested 🙂
Thanks for the pattern! I started one the other day but took it apart because I was worried about proportion. Id like a 4×6. I did a few rounds following your pattern but it seemed like it was getting too long too quickly. Is that normal?
The difference between width and length is determined by the length of the chain you start with. Once you complete the first “row” the blanket will grow in all directions equally, it will grow by the size of a double crochet for every additional row. If you start with a chain that is 2 feet long, then when it is 4 feet wide it will be 6 feet long.
Hi, thanks so much for this pattern!! It’s the nicest centre to a blanket I’ve seen. I love to make baby blankets from self striping yarn with this as the beginning, it just blends in with the pattern. My baby loves them Xxx
Jim, thank you so much for sharing this! I recently discovered the never-ending-granny-square, but realized quickly that I wanted to make rectangles instead. Thanks to the tutorial above, I’m happily rectangling away!
this awesome thanks.
I really appreciate your explanation of how the length of the starting chain determines the length vs. width proportion of the “granny rectangle” FO. I love doing granny squares, but my “knit night” group is currently making car seat blankies (22″x26″) for a local charity, so I needed to figure out how to produce a single rectangle in those proportions mostly using the granny square technique I already know — so I could churn out those rectangular car seat afghans as quickly as possible. Haven’t yet decided whether to go the “never-ending granny” route or one of the “granny rectangle” patterns that’s closer to a traditional granny square, but at least I now have a better idea of how to adapt one of those other patterns to get the proportions I need!